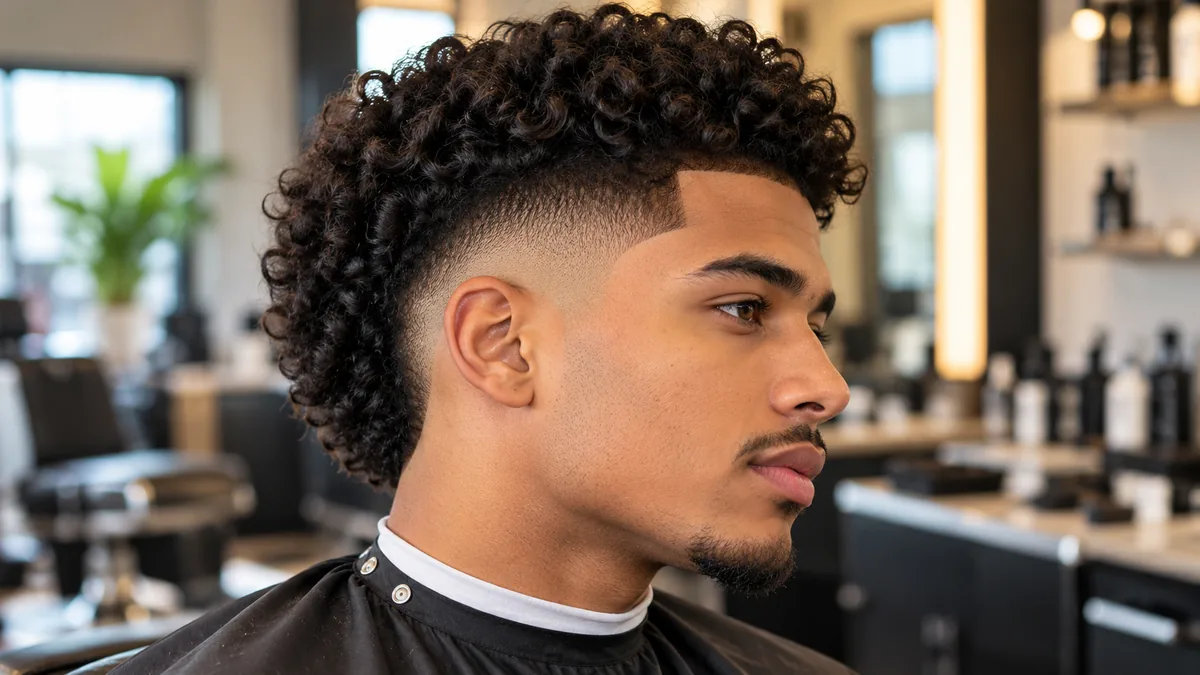
Your curls sit perfectly on top but turn into a wide, puffy mess right around the ears. Every trip to the shop either strips too much length or leaves the sides looking heavy and unshaped. A burst fade curly hair cut fixes both problems at once by carving a tight half-circle around the ear while the crown and back stay full and untouched.
This guide walks you through every version of the cut, the real pricing, your curl type’s shrinkage rate, and the exact words to use in the barber chair.
The burst shape hugs the ear in a curved arc. Hair is shortest directly behind the ear and gradually gets longer as it fans upward toward the crown and backward toward the nape. Unlike a drop fade or a standard mid fade, the back never gets taken down short, which is exactly why this cut pairs so naturally with curly mullets and mohawks.
It works across all curl types from loose 2A waves to dense 4C coils, but the final result hinges on three variables: how much your curls shrink when dry, the guard length left on top, and whether your barber cuts textured hair in its dry state.
Plan on a touch-up every two to three weeks to keep the arc sharp. Insist on dry cutting to keep the length accurate.
What a Burst Fade Actually Is
Imagine drawing a small sunburst around your ear. The center of the burst sits just behind and slightly below the ear, and the “rays” spread outward and upward as the hair gets progressively longer. That curved gradient is the defining feature of the entire cut.
What separates this fade from every other option is what happens at the back of the head. The burst arc stops before it reaches the nape, so the hair in the back retains enough length to curl, flip, or grow out into a mullet. A drop fade continues all the way down and around the neckline. A standard mid fade wraps uniformly around the entire head.
Curly textures grow outward before they grow downward. That sideways expansion is what creates the dreaded pyramid silhouette. The burst removes bulk precisely where curls flare the widest — right around the ear — while preserving the volume on top that gives the style its character.
Burst Fade vs Taper vs Drop Fade vs Mid Fade
These terms get mixed up constantly, and different shops interpret them in different ways. Here is how each option actually behaves on curly hair.
| Cut | Blending Zone | Back of Head | Contrast Level | Ideal Pairing |
| Burst fade | Curved half-circle around the ear | Left long | Moderate to strong | Curly mullet, mohawk, fringe |
| Taper | Sideburns and neckline only | Trimmed, not faded | Subtle | Longer curly tops, office-friendly looks |
| Drop fade | Arcs behind the ear and drops to the nape | Faded short | Strong | Curly crops, tight textured tops |
| Mid fade | Straight horizontal line at temple height | Faded all the way around | Strong | Afro shapes, blowouts |
A taper is the quietest choice and grows out the most gracefully. Both the drop fade and the mid fade take the back down short, which suits anyone wanting a tight, uniform outline. The burst fade deliberately preserves length in the back, making it the right pick when you want clean sides and a longer, curly rear profile.
Low, Mid, and High Burst Fade
The height simply tells your barber how far up the arc climbs before it meets the longer hair on top. Everything else stays the same.
| Burst Height | Arc Climbs To | Side Weight Retained | Visual Contrast | Grow-Out Pace |
| Low burst | Just above the ear | Most | Soft | Slowest |
| Mid burst | Around the temple | Moderate | Balanced | Medium |
| High burst | Above the temple toward the crown | Least | Sharp | Fastest |
A low burst is the safest starting point for first-timers and anyone with finer curls that need side support. A mid burst is the most requested version and looks clean from every angle in photos. A high burst shines on dense 3C to 4B hair where the top carries enough weight to balance a large area of exposed skin.
Curl Type, Shrinkage, and Porosity
The curl classification system most barbers reference spans from 2A loose waves up to 4C tight coils. It originated with the Andre Walker Hair Typing System, and curl-focused salons later expanded it to factor in strand density and diameter. For a burst fade curly hair cut, the single most important number is your shrinkage rate — the percentage of visible length your curls lose once they dry.
Research published through the National Center for Biotechnology Information (ncbi.nlm.nih.gov) confirms that curly hair fibers possess a flattened, elliptical cross-section, which causes them to coil tightly and spring back after being stretched. Straight hair barely changes length between wet and dry states. Tightly coiled hair can lose more than half its apparent length as it dries.
| Curl Type | Pattern | Typical Shrinkage | Top Length Guidance |
| 2A to 2C | Loose waves | 10 to 20 percent | Standard guard works fine, add slight extra at the fringe |
| 3A to 3B | Springy ringlets | 20 to 30 percent | Request one guard size longer than your reference photo shows |
| 3C | Tight corkscrews | 30 to 40 percent | Top must be cut dry, verify length after full drying |
| 4A to 4B | Tight coils | 40 to 60 percent | Dry cutting is mandatory, no exceptions |
| 4C | Densest coils | 50 to 70 percent | Dry cut only, keep moderate length, confirm before the final pass |
Porosity affects the care routine rather than the cut itself. Low porosity hair repels water and product, so it needs lighter layers applied to very wet strands. High porosity hair absorbs moisture quickly but loses it just as fast, requiring a leave-in base followed by a sealing cream. Identical cut, entirely different daily routine.
Curl Care Vocabulary Worth Knowing
These terms come up in nearly every curly hair discussion. Learning them makes both the barber conversation and your home routine smoother.
- Clumping. Individual strands grouping into defined ringlets rather than separating into a frizzy halo. Nearly all curl products are formulated to promote this.
- Cast. The stiff, crunchy shell that gel or mousse leaves behind once fully dry. It is a temporary stage you break on purpose, not a mistake.
- Scrunch out the crunch (SOTC). The step where you squeeze dry, crunchy curls with clean hands until the cast crumbles and soft, defined curls appear underneath.
- Wash and go. Wash, apply product, let the hair dry without any additional shaping. The default routine for the lowest-effort styles listed below.
- Second-day curls. How your pattern behaves the day after washing, once natural oils redistribute through the strands. Many 3B to 4A textures genuinely look better on day two.
- Shrinkage. Already covered above, but worth repeating because it ruins more curly cuts than any other single factor.
- Line-up (edge-up). A sharp, straight edge shaved into the hairline at the forehead and temples for a clean geometric frame.
15 Burst Fade Curly Hair Styles
Arranged from least daily effort to most. Pick based on how many minutes you actually want to spend each morning, not on which photo catches your eye.
1. Classic burst fade curly hair with natural curls
Curls rest at a moderate length and fall exactly where they grow. The arc around the ear handles all the shaping. The safest first request if you have never had a fade before.
2. Short curly crop with burst fade
The top maintains a noticeable yet tight curl pattern near the scalp. Morning styling takes under two minutes with a small amount of curl cream.
3. Curly buzz with burst fade
A number two or three guard on top, the burst shaved tight around the ear. The curl pattern barely forms, but the arc gives the head a deliberate, clean outline.
4. Burst fade afro
The crown maintains a rounded, picked-out silhouette. Dense hair holds the shape well between visits, making this a top choice for 4A to 4C textures.
5. Burst fade with curly fringe
Curls fall forward across the forehead. In addition to providing natural coverage for a higher hairline, this softens square and heart-shaped faces.
6. Burst fade curly hair mullet
The iconic combination. A short arc wraps the ear while curls grow longer toward the nape. This variation has maintained steady popularity for several years with no signs of fading.
7. Burst fade curly mohawk
The sides shave into the arc, leaving a strip of curls running from the forehead to the crown. Bold contrast without requiring full afro volume.
8. Burst fade with curly quiff
The front section lifts and sweeps backward for added height. You will need a diffuser and a light-hold cream, or gravity pulls the quiff flat by midday.
9. Burst fade blowout
Curls dried outward and upward for maximum volume. Best suited to 3C through 4B density because finer curl types lack the mass to sustain the shape all day.
10. Skin burst fade with defined ringlets
The arc drops all the way to bare skin. Well-moisturized ringlets on top produce the sharpest contrast of any style on this list.
11. Burst fade with line-up
A crisp geometric edge at the forehead and temples meets the organic curl pattern. Adds sharpness without removing any length from the top.
12. Burst fade with beard blend
The arc flows directly into a groomed beard, creating one continuous frame from temple to jawline. Match the beard fade height to the hair fade height or the mismatch becomes the first thing people notice.
13. Burst fade with shaved design
A single line or small geometric pattern carved near the edge of the arc. The curls remain the focal point; the design serves as a subtle accent.
14. Burst fade with twists or sponge coils
Sponge-twisted coils sit on top of a clean burst arc. Extremely popular on 4A to 4C hair and holds its shape for days when protected with a satin bonnet overnight.
15. Permed burst fade curly hair
Designed for straight or wavy hair that wants instant curl. The perm creates the texture while the burst keeps the overall shape looking deliberate. Wait at least one full week after perming before scheduling your first fade touch-up so the curls have time to settle.
When This Cut Isn’t the Right Call
Most style guides skip this part entirely. A burst fade produces more side contrast than the top can visually support if your curls are sparse and delicate rather than dense, making the crown appear thin in contrast. A low taper is a much safer starting point.
If you are in the middle of a long grow-out and plan to skip the barber for months, the arc will vanish and the pyramid shape will return within roughly five weeks. A taper grows out far more gracefully under those conditions.
Finally, if your hairline recedes sharply at the temples, a high burst can draw unwanted attention to the thinning area. A low or mid burst preserves more coverage exactly where you need it.
What a Burst Fade Costs
Pricing tracks your location and the barber’s level of experience with textured hair. Approximate US ranges as of this year:
| Cost Factor | Standard Barbershop | Curly Hair Specialist |
| Per cut | $25 to $45 | $45 to $80 |
| Time in chair | 25 to 35 minutes | 40 to 55 minutes |
| Visit frequency | Every 2 to 3 weeks | Every 2 to 3 weeks |
| Line-up add-on | $5 to $15 | $10 to $20 |
| Beard blend add-on | $10 to $20 | $15 to $30 |
| Shaved design add-on | $10 to $25 | $20 to $40 |
| Rough monthly total | $55 to $100 | $90 to $160 |
The specialist charges more per visit, but the cut typically holds its shape longer because the top was measured dry and the arc was blended to match your specific growth pattern. The whole expense usually balances out over the course of a full year.
How to Choose the Right Barber
Not every barber who delivers clean fades on straight hair understands how curls behave. A shop that primarily handles straight textures tends to soak everything with water, run thinning shears through the top, and send you home with a cut that shrinks into something you never agreed to.
Open up a barber’s Instagram page or their Google Business photo gallery and pay close attention to the hair textures in their portfolio. If ninety percent of their work shows straight or wavy hair with a single curly client sprinkled in, that tells you everything about where their real skill set lives.
To avoid needless breakage and damage, the American Academy of Dermatology (aad.org) urges people to look for hair specialists who truly understand their unique hair texture. That same reasoning carries over to the actual shape of the cut — a barber comfortable working with tight 4A coils will approach the fade very differently than one who primarily handles loose 2B waves.
Word of mouth still works better than any online search. Men walking around with sharp burst fade curly hair cuts already know the exact chair they sat in, and most will happily share the name if you ask.
How to Talk to Your Barber
Walking into the shop with a vague request is the fastest way to leave disappointed. Nail down these six details before you sit in the chair, and say them as directly as possible.
- Name the cut clearly. Use the words “burst fade” out loud. Describing it as “a fade that goes around the ear” often gets misheard as a drop fade, and you end up with a short back you never wanted.
- Pin down the burst height. Tell the barber “low,” “mid right at the temple,” or “high above the temple.” Avoid the word “medium” entirely — every shop interprets it differently.
- Specify the shortest finish. Decide whether you want bare skin, a shadow (zero-gap or half-guard length), or a full number one at the tightest point of the arc. There is no universal default, so if you stay quiet the barber picks for you.
- Call out the top guard size. A Guard 1 leaves about 3 mm, a Guard 2 about 6 mm, a Guard 3 about 10 mm, a Guard 4 about 13 mm, and a Guard 6 about 19 mm. The majority of curl patterns that require ringlet definition to be apparent perform best at a 4 or higher. Always request the longer option first — taking more off later is easy, but putting length back is impossible.
- Mention your curl type and how much it shrinks. A quick statement like “I have tight 3C curls that shrink roughly a third” hands your barber real technical data before the clippers even turn on.
- Describe the back and neckline. Tell the barber exactly how much length to leave in the back and whether you prefer a rounded, tapered, or squared-off neckline. Make this decision before the cape goes on, not halfway through the cut.
Once those six points are covered, follow up with two straightforward questions: Do you prefer cutting curly hair wet or dry? and Have you performed this specific fade on my curl type before? A confident, detailed response is a green flag. If the only answer you get is “I always cut wet,” that is your signal to try a different chair.
Is Cutting Curly Hair Wet or Dry Better?
Choose mostly dry hair, or at the very least, dry hair. Because water briefly releases each strand’s inherent spring, soaking wet curls expand out. If the barber measures and cuts at that elongated length, the top snaps back significantly shorter the moment it dries and the curl pattern returns.
Barbers who handle textured hair on a daily basis typically map out the burst arc and establish the rough top length while the hair is still dry, since that is the only reliable way to observe the true curl formation from the very start. They might lightly mist small sections near the hairline for precision line-up work, then perform one final length verification once everything has dried completely.
Certain curl-focused salons push this approach even further by cutting each individual ringlet in its natural resting position rather than slicing straight across large sections. You do not need to go that extreme to walk away with a great burst fade curly hair result, but the underlying rule stays the same: detangle while the hair is wet, avoid running a brush through dry curls at all costs, and only confirm the final length after the hair is fully dry.
Burst Fade by Face Shape
| Face Shape | Flattering Choices | Styles to Skip |
| Oval | Virtually every burst variation looks balanced | No real restrictions |
| Round | Added height on top, quiff or mohawk styling, mid to high burst placement | Leaving wide volume at the sides |
| Square | Forward-falling curly fringe, looser ringlet patterns on top | Extremely short blunt tops paired with a high burst |
| Heart | Low or mid burst placement, volume concentrated at the crown | Bulk accumulating around the temple area |
| Long | Low burst, curly mullet silhouette, added width across the sides | Piling extra height on top |
| Diamond | Soft rounded curl formations, mid-level burst | Harsh angular shaved patterns |
Grow-Out Timeline
Weeks 1 through 2. This is when the arc looks its absolute cleanest. The skin-tight portions of the fade create the most dramatic contrast against the curls sitting on top.
Weeks 2 through 3. The sides start growing back in slightly. The overall contrast begins to soften, but the silhouette still reads as intentional and tidy, particularly if the barber left a shadow finish rather than bare skin.
Weeks 3 through 4. The blending line starts to lose its sharpness and the edge of the arc becomes harder to distinguish. This is the window when most men schedule their next appointment.
Beyond week 4. Side bulk returns in full force and the dreaded pyramid silhouette starts creeping back. If your barber used a shadow finish instead of taking the fade all the way to skin, the cut will hold up noticeably better through this period than a skin-close version would.
Styling Routine Step by Step
- Wash with a sulfate-free shampoo no more than once every two to three days. Curly textures rely on their natural scalp oils far more heavily than straight hair does, and over-washing strips that protection away.
- Work a moisturizing conditioner through the hair from the mid-lengths down to the tips. Use your fingers or a wide-tooth comb to gently separate any tangles while the conditioner is still coating the strands.
- Smooth a leave-in conditioner over the hair while it is still dripping wet. This step creates the moisture foundation that every product applied afterward will build on.
- Add curl cream, mousse, or a lightweight gel based on how much hold your style demands. Scrunch the product upward into the curls — raking your hands downward flattens the pattern and creates frizz.
- Dry using a diffuser set to low heat, or simply let the hair air dry on its own. Angle the diffuser upward so the curls closest to the burst arc stay lifted and full rather than getting pressed flat against the head.
- Break the cast once the hair is completely dry. Gently scrunch the curls with clean, dry hands until the stiff gel shell crumbles away and soft, defined ringlets emerge underneath.
- Tidy the arc edge with a small dab of edge control along the hairline if the line-up has started to blur between barber visits.
Product Checklist
| Product | Purpose | When to Use |
| Sulfate-free shampoo | Cleanses without stripping oils | Wash day, every 2 to 3 days |
| Deep conditioner | Restores moisture and elasticity | Weekly |
| Leave-in conditioner | Moisture base layer | On soaking wet hair after washing |
| Curl cream | Defines pattern, controls frizz | After leave-in, before drying |
| Light-hold gel or mousse | Extra hold for quiffs and blowouts | Optional, over curl cream |
| Curl sponge | Creates twists and coils | On damp 4A to 4C hair |
| Diffuser attachment | Faster drying with volume | During drying |
| Refresh spray | Revives pattern between washes | Day 3 or 4 |
| Edge control | Cleans the hairline and arc edge | Between barber visits only |
| Satin pillowcase or bonnet | Prevents overnight friction and dryness | Every night |
Maintenance Between Visits
The fade and the curls operate on two completely separate schedules. The arc demands a barber visit every two to three weeks because the sides always outgrow the top. A skin finish blurs faster than a shadow finish, so if you want to stretch closer to four weeks between appointments, request a shadow.
At home, switch to a satin or silk pillowcase. Cotton absorbs moisture from curls overnight and leaves them dry and frizzy by morning. For longer curly tops, gather the hair loosely upward into a pineapple before bed so the curl pattern does not get crushed flat while you sleep.
Between cuts, resist the urge to touch up the arc yourself. Grabbing clippers and attempting a DIY fix almost always produces an uneven edge that forces the barber to raise the entire fade higher than you wanted just to correct the mistake.
Common Mistakes That Wreck This Cut
- Cutting the top while it is soaking wet. This is the single most frequent complaint from curly-haired clients. Request a dry cut every time without exception.
- Running a brush through dry curls. This shatters curl clumps into instant frizz. Only detangle when the hair is wet or coated with conditioner.
- Letting the arc grow past the three-week mark. The contrast that gives the cut its entire identity disappears once the sides fill back in.
- Skipping the leave-in conditioner. Unprotected curls frizz by midday no matter how clean the fade looked in the chair.
- Ignoring your porosity level. Applying the same amount of product to low porosity hair versus high porosity hair causes either buildup or severe dryness. Adjust based on how quickly your strands absorb water.
- Bringing a reference photo that does not match your curl type. A 2C wave photo will not translate onto 4B coils. Shrinkage and volume behave too differently across types.
- Confusing a burst with a drop fade. Say the name clearly or you risk walking out with a short back you never asked for.
- Letting the barber use thinning shears on top. Texturizing shears shred curl clumps apart. Scissors or guarded clippers only.
- Washing every single day. Daily washing strips the natural oils that curly hair depends on far more than straight hair does.
Alternatives If Burst Isn’t Right
- Low taper. Retains the most side weight and offers the gentlest introduction to shorter sides.
- Mid taper fade. Blends downward from the temple with a cleaner nape than a burst provides.
- Drop fade. Follows a similar arc behind the ear but continues all the way down to the neckline for a tighter back profile.
- Temple fade. Only the temple and sideburn areas get faded while everything else stays long.
- Classic skin fade. Uniform short sides and back for maximum contrast with an afro or blowout top.
Conclusion
A burst fade curly hair cut earns its strong reputation because it works with the way curls naturally grow instead of fighting against it. The arc strips bulk from the sides where volume builds the fastest, the back retains enough length to flip or grow into a mullet, and the top stays full and completely yours.
Every curl type from loose waves to tight coils can pull this cut off when the barber cuts dry and accounts for shrinkage from the start.
Book your next appointment with someone whose portfolio actually shows curly clients. Walk through the door with your burst height, your guard number, your preferred finish, and a reference photo that matches your own curl type. Then protect the result at home with a leave-in conditioner, a satin pillowcase, and a touch-up on the calendar before the arc starts to blur. Follow those steps and the cut you picture in your head is the cut you walk out with
Featured Guides
Hand‑picked articles to level up your style & grooming
Mid Taper Fade Curly Hair: Full Breakdown 2025
Cut anatomy · Hair‑type matching · 5‑minute styling & barber communication tips.
Read Guide
Shag Haircuts for Women Over 50: Flattering Styles Guide
Face‑shape matching · Low‑maintenance styling · Salon pricing & safety checklist.
Read Guide
Dallas Shag Haircut: Style Guide, Prices & Tips 2025
Salon pricing · Face‑shape matching · 10‑minute styling & maintenance routine.
Read Guide